Chapter 5: Capture what users say - Intents and Slots
In the previous chapters of this voice course for beginners, you learned how to make a voice assistant talk (using sendText action) and how to make it listen (using getInput action).
In this chapter, you make a voice assistant understand what the user is saying by defining intents, utterances, and slots. Moreover, you teach an assistant to make decisions based on user’s input.

If you are having trouble with any of these terms, we’ve covered the voice terminology in Chapter 1: Understand How Voice Assistants Work.
On this page
- Recap - your conversational interface so far
- What happens
next - Defining custom intent
- Understanding built-in slots
- Creating custom slots
- Putting it all together
- Hearing the results
- Next steps
Recap - your conversational interface so far
Let’s take a quick look at the BotTalk code you’ve written so far:
    - name: Initial step
      actions:
        - sendText: >
            Welcome to Greetings from Earth.
            What is your name?
        - getInput:
      next:
        AMAZON.CancelIntent: Exit
        AMAZON.StopIntent: Exit
        AMAZON.HelpIntent: Help
There are two commands (actions) you instruct a voice assistant to do:
- Greet a user and ask a question - with
sendTextaction - Put a voice assistant in listening mode with
getInputaction
However, when you go to the Test tab and run a Random Walker Test now, all you get is either:
Assistant: Here is a bye-bye text
or
Assistant: Here is the help text
Why is that?
Well, study the rest of the scenario and code, and you can notice that steps Exit and Help define these sentences:
    - name: Exit
      entrypoint: true
      actions:
        - sendText: 'Here is a bye-bye text'

    - name: Help
      entrypoint: true
      actions:
        - sendText: 'Here is the help text'
        - getInput:
      next:
        ok_great: Initial step
Still, what is the connection between asking a user a question with getInput and jumping to these steps? This connection lives in the next section. Which we cover next (pun intended).
What happens next
As we described at length in the How voice assistants work chapter of this course, the primary goal of BotTalk as a fulfillment service is to make a decision based on what the user has provided as input.
This decision-making process takes places in the next section of the step. As a voice developer, your job is to link a possible intent with the next step.
Take a look at the next section one more time:
next:
  AMAZON.CancelIntent: Exit
  AMAZON.StopIntent: Exit
  AMAZON.HelpIntent: Help
Let’s go through it line by line.
AMAZON.CancelIntent is a so-called Amazon built-in intent. Built-in intents stand for ubiquitous user phrases.
When a user might say something like “Cancel” or “Quit” AMAZON.CancelIntent gets sent to BotTalk. In our script, we connect this intent with the step Exit. The same thing happens when the user triggers an AMAZON.StopIntent with the phrase like “Stop” or “Enough” - we want the dialog to jump to the Exit step.
On the other hand, when a user says “Help” or “I need help”, Alexa triggers an AMAZON.HelpIntent and we connect it to Help step.
So the sole job of the next step is to help BotTalk decide - what happens next - after a user triggers a particular intent.
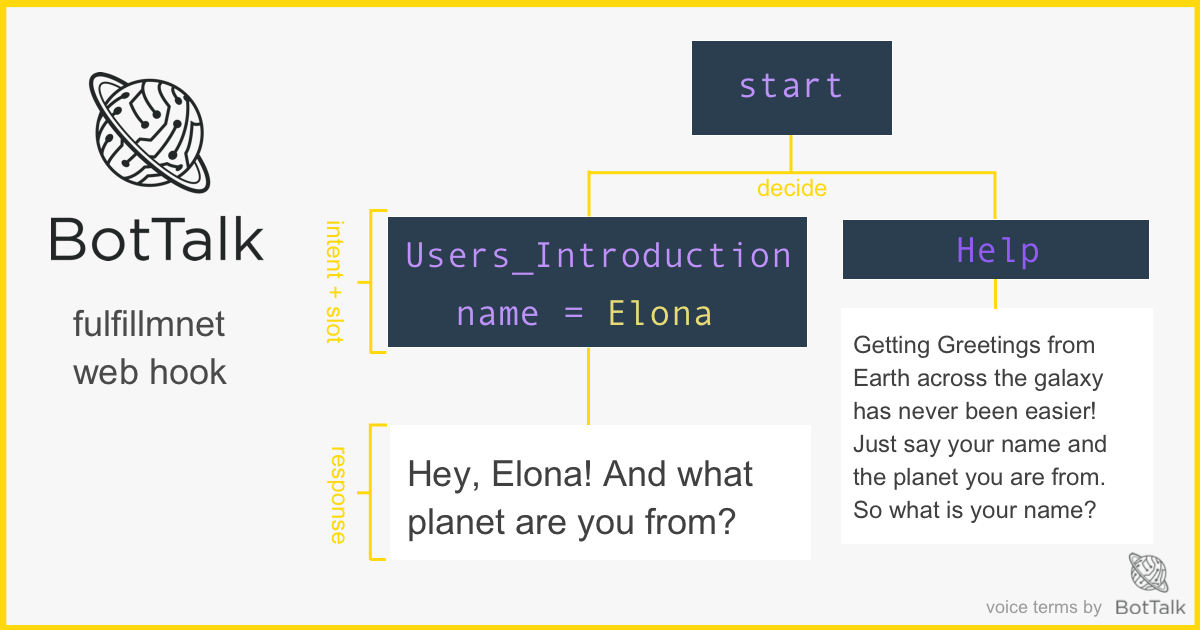
Defining custom intent
In the last section, you learned how to connect Amazon built-in intents with the corresponding next steps. However, what if you want something more custom. For example, remember the senstence that we expect from the user?
Assistant: Welcome to Greetings from Earth. What is your name?
User: My name is Elon
How do we define this answer as an intent? Easy enough!
Head over to the Intents sections in the editor. You already have one intent there called ok_great - to get you started. Let’s create a new one.
Try to imagine what a user might answer the question “What is your name?”
---
intents:
  ok_great:
    - 'OK'
    - 'Great'
  Users_Introduction:
    - 'my name is {name}'
    - 'you can call me {name}'
    - '{name} is my name'
    - "I'm {name}"
    - '{name}'
In the code above we defined one intent named Users_Introduction and just below are all the possible variants of how a user might say that (they are called utterances).
So someone who doesn’t talk a lot would say: “Elon”, but there are folks out there who give an effort and want to be polite, so they would go with something like “You can call me Elon”.
It’s your job as a designer of a voice app to come up with those variants. As you can imagine, people are different. So is the way they choose to answer even simplest, straightforward questions. The more utterances you provide for each intent, the more likely a voice assistant will understand the user correctly.
The voice assistants are as “smart” as we make them.
Ok, let’s get back to our script. You might have noticed each utterance also has a {name} variable inside of it. This variable is called a slot - and holds the actual name that the user provides.
Understanding built-in slots
As you might imagine, a name is a common enough thing to ask a user, so both platforms - Amazon and Google - provide a built-in slot for this slot type. Because BotTalk lets you create scenarios for both platforms, you can use the universal slot types - using @bottalk as a prefix.
Head over to the Slots sections in the editor. Add a new slot type for the name slot:
---
slots:

  name: '@bottalk.name'
In the script above you define a slot name to have a type of @bottalk.name.
There are a lot of built-in slots you can use for the most common use-cases out there: @bottalk.color, @bottalk.date, @bottalk.number to name a few. You can see the full list and learn more about them in our built-in slots documentation.
Creating custom slots
Although it’s convenient to use built-in slots, sometimes what you need is more specific and custom.
For instance, for this dialog between a voice assistant and a user:
Assistant: And what planet are you from?
User: I’m from Mars.
First of all, let’s define an intent in the Intents section of the BotTalk editor:
Users_Planet:
  - "I'm from {planet}"
  - "I live on {planet}"
  - "{planet} is my homeworld"
  - "{planet}"
Once again, we expect our users to be brief and say the planet name - “Mars”, but we’re also prepared for something more colloquial: “Mars is my homeworld”.
What you need to do now is to add a custom slot with the name planet. You do that in the Slots section:
---
slots:

  planet:
    - Mercury
    - Venus
    - Mars
    - Jupiter
    - Saturn
    - Uranus
    - Neptune
    - Pluto
    - Earth


  name: '@bottalk.name'
That’s how easy it is to define your custom slots: just a name of the slot followed by the list of the possible values.
Putting it all together
Now that you understand Alexa built-in intents, custom intents, can create both built-in and custom slots, you can put it all together. In this section, you learn how to create logical dialog flow by connection the user’s intent with the corresponding step.
We start with the Initial step, and connect a custom intent you created earlier - Users_Introduction - with a new step Ask for planet:
- name: Initial step
  actions:
    - sendText: >
        Welcome to Greetings from Earth.
        What is your name?
    - getInput:
  next:
    Users_Introduction: Ask for planet
    AMAZON.CancelIntent: Exit
    AMAZON.StopIntent: Exit
    AMAZON.HelpIntent: Help
If you try saving the scenario now, BotTalk complains:
You have following error: Next step does not exist: Link to step “Ask for planet” not found among steps Initial step, Exit, Help
Those error messages can be very helpful constructive, so do read them carefully! If you hit the roadblock, you can copy them and post it into our Closed Facebook Community. There other BotTalk developers help each other to figure out issues, problems and answer any questions you have.
Indeed, we made a connection between Users_Introduction intent and Ask for planet step, but we haven’t created this step yep.
Let’s change that:
- name: Ask for planet
  actions:
    - sendText: "And what planet are you from?"
    - getInput:
  next:
    Users_Planet: Send the Greeting
In this little step you’re asking a user another question - And what planet are you from? - with a sendText action and then put a voice assistant in a listening mode with a getInput action.
You expect a user to respond with the Users_Planet which you defined in the custom intents section of this chapter. You connect that intent with Send the Greeting step.
Now all you need to do is to create a step that sends this sentece to the user:
Assistant: Dear Elon, your very personal Greetings from Earth will reach Mars in about 22 light-minutes.
Let’s create it together:
    - name: Send the Greeting
      actions:
        - sendText: >
            Dear {{name}}, your very personal Greetings from Earth
            will reach {{planet}} in about 22 light-minutes.
By now you should be getting familiar with the general structure of the BotTalk’s steps. What is new though, is that we use {{name}} and {{planet}} inside of the sendText action.
These are called variables. BotTalk creates them automatically when a user “fills in” the slot by answering a question. Notice that you must use the double curly braces to output (interpolate) the value of the variables in a sendText action.
Hearing the results
After you have put all this work, you must be eager to hear the results. However, you still probably have not connected BotTalk to your Amazon developer account or your Dialogflow account.
Good thing that BotTalk comes in with an automated voice tester! You can listen to your voice app directly in your browser.
Just click on the Test tab at the top of the screen and run the Random Walker Test.
You might have to run it several times, since it hits the Exit and Help steps very often.
Why?
Look at the Initial step and more specifically at the next section:
    next:
        Users_Introduction: Ask for planet
        AMAZON.CancelIntent: Exit
        AMAZON.StopIntent: Exit
        AMAZON.HelpIntent: Help
Being random a tester has only one chance out of four to hit your custom Users_Introduction intent.
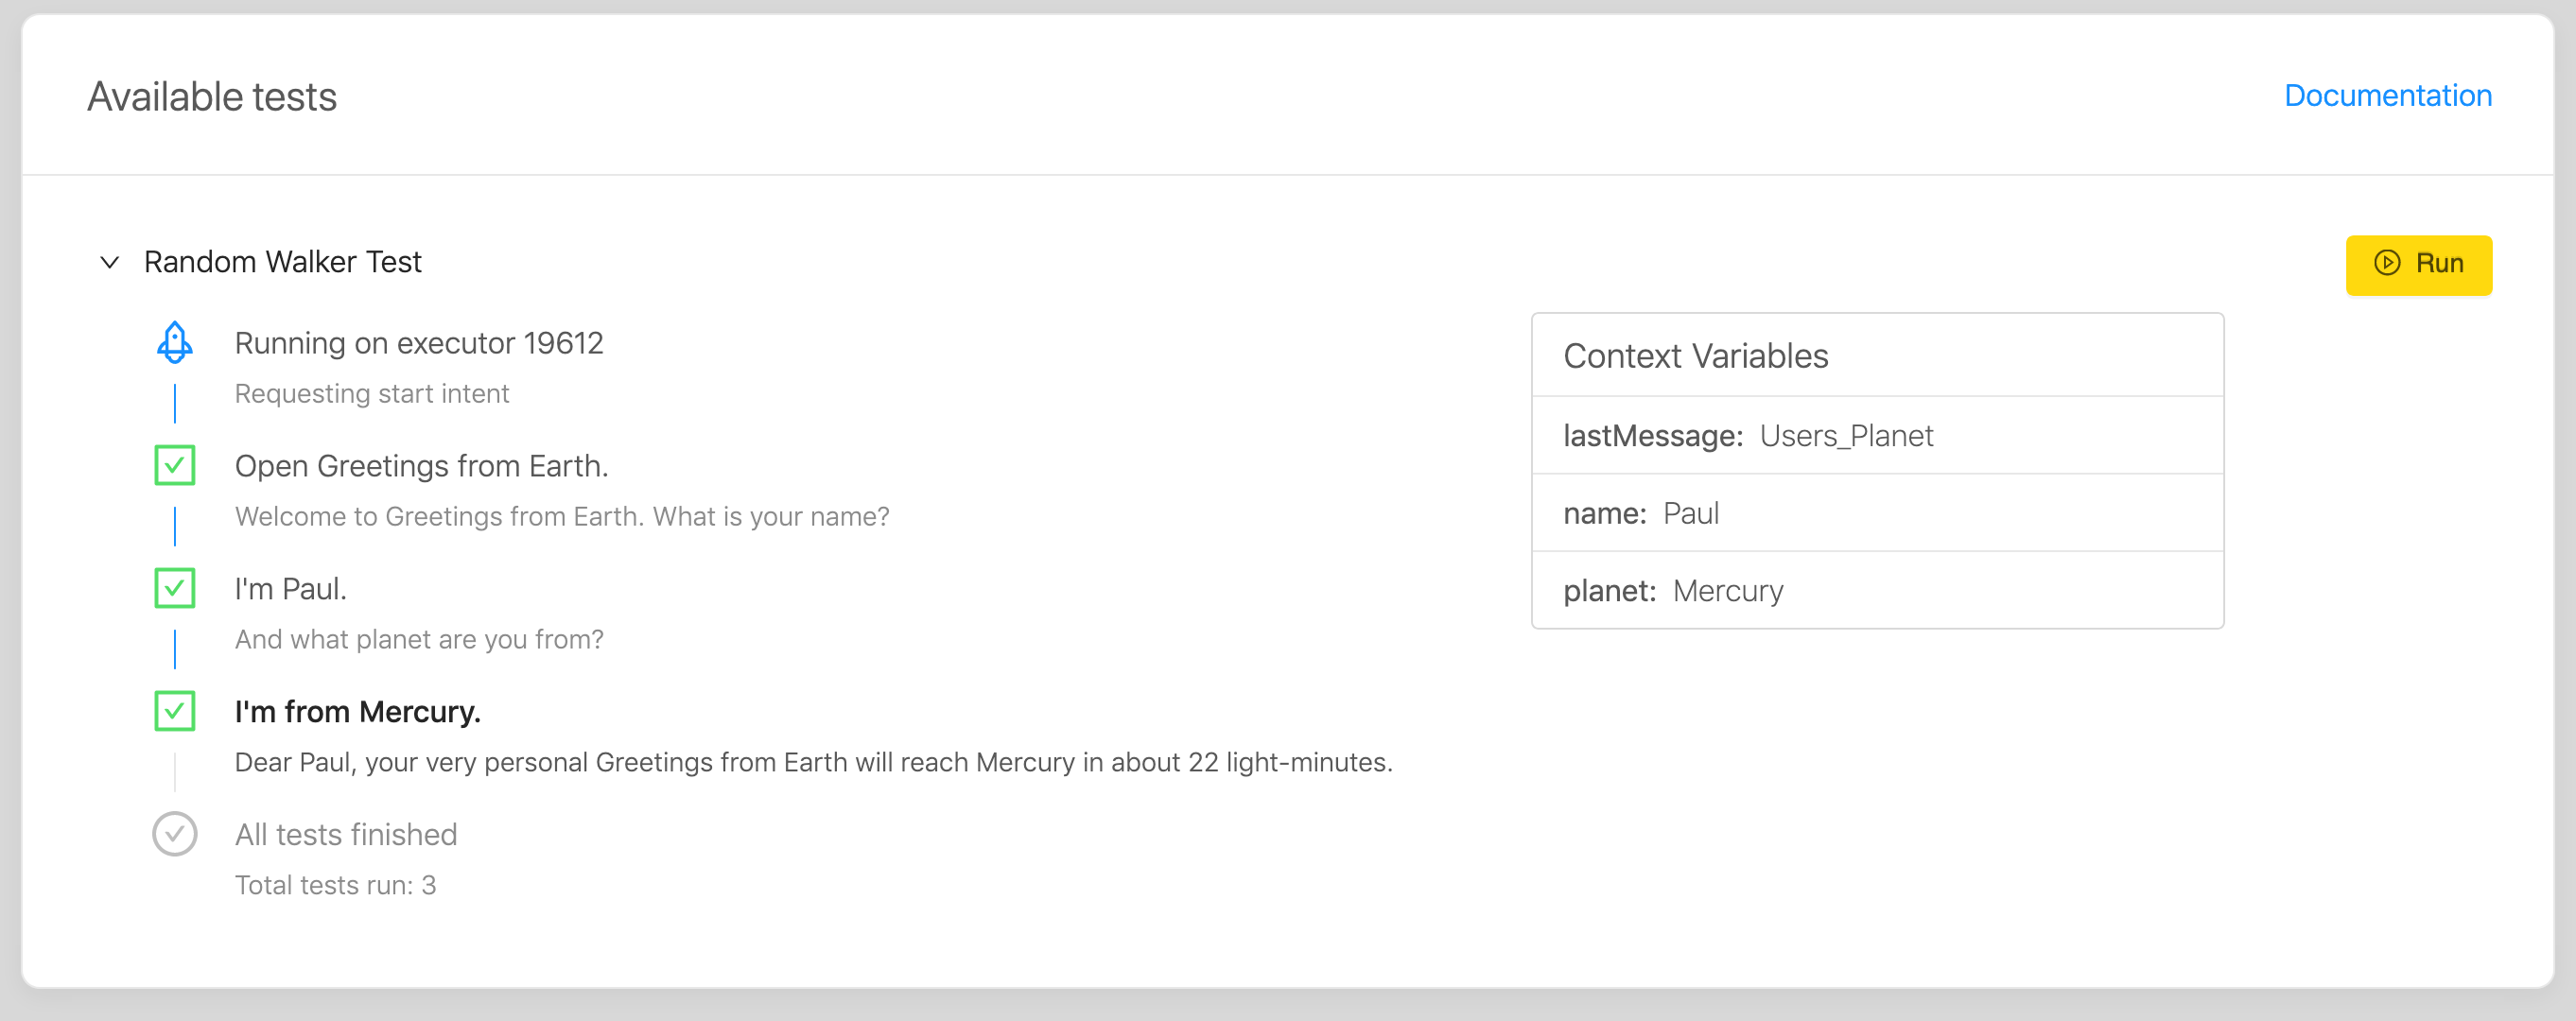
However, once it hits it, you’ll be delighted to hear the result:
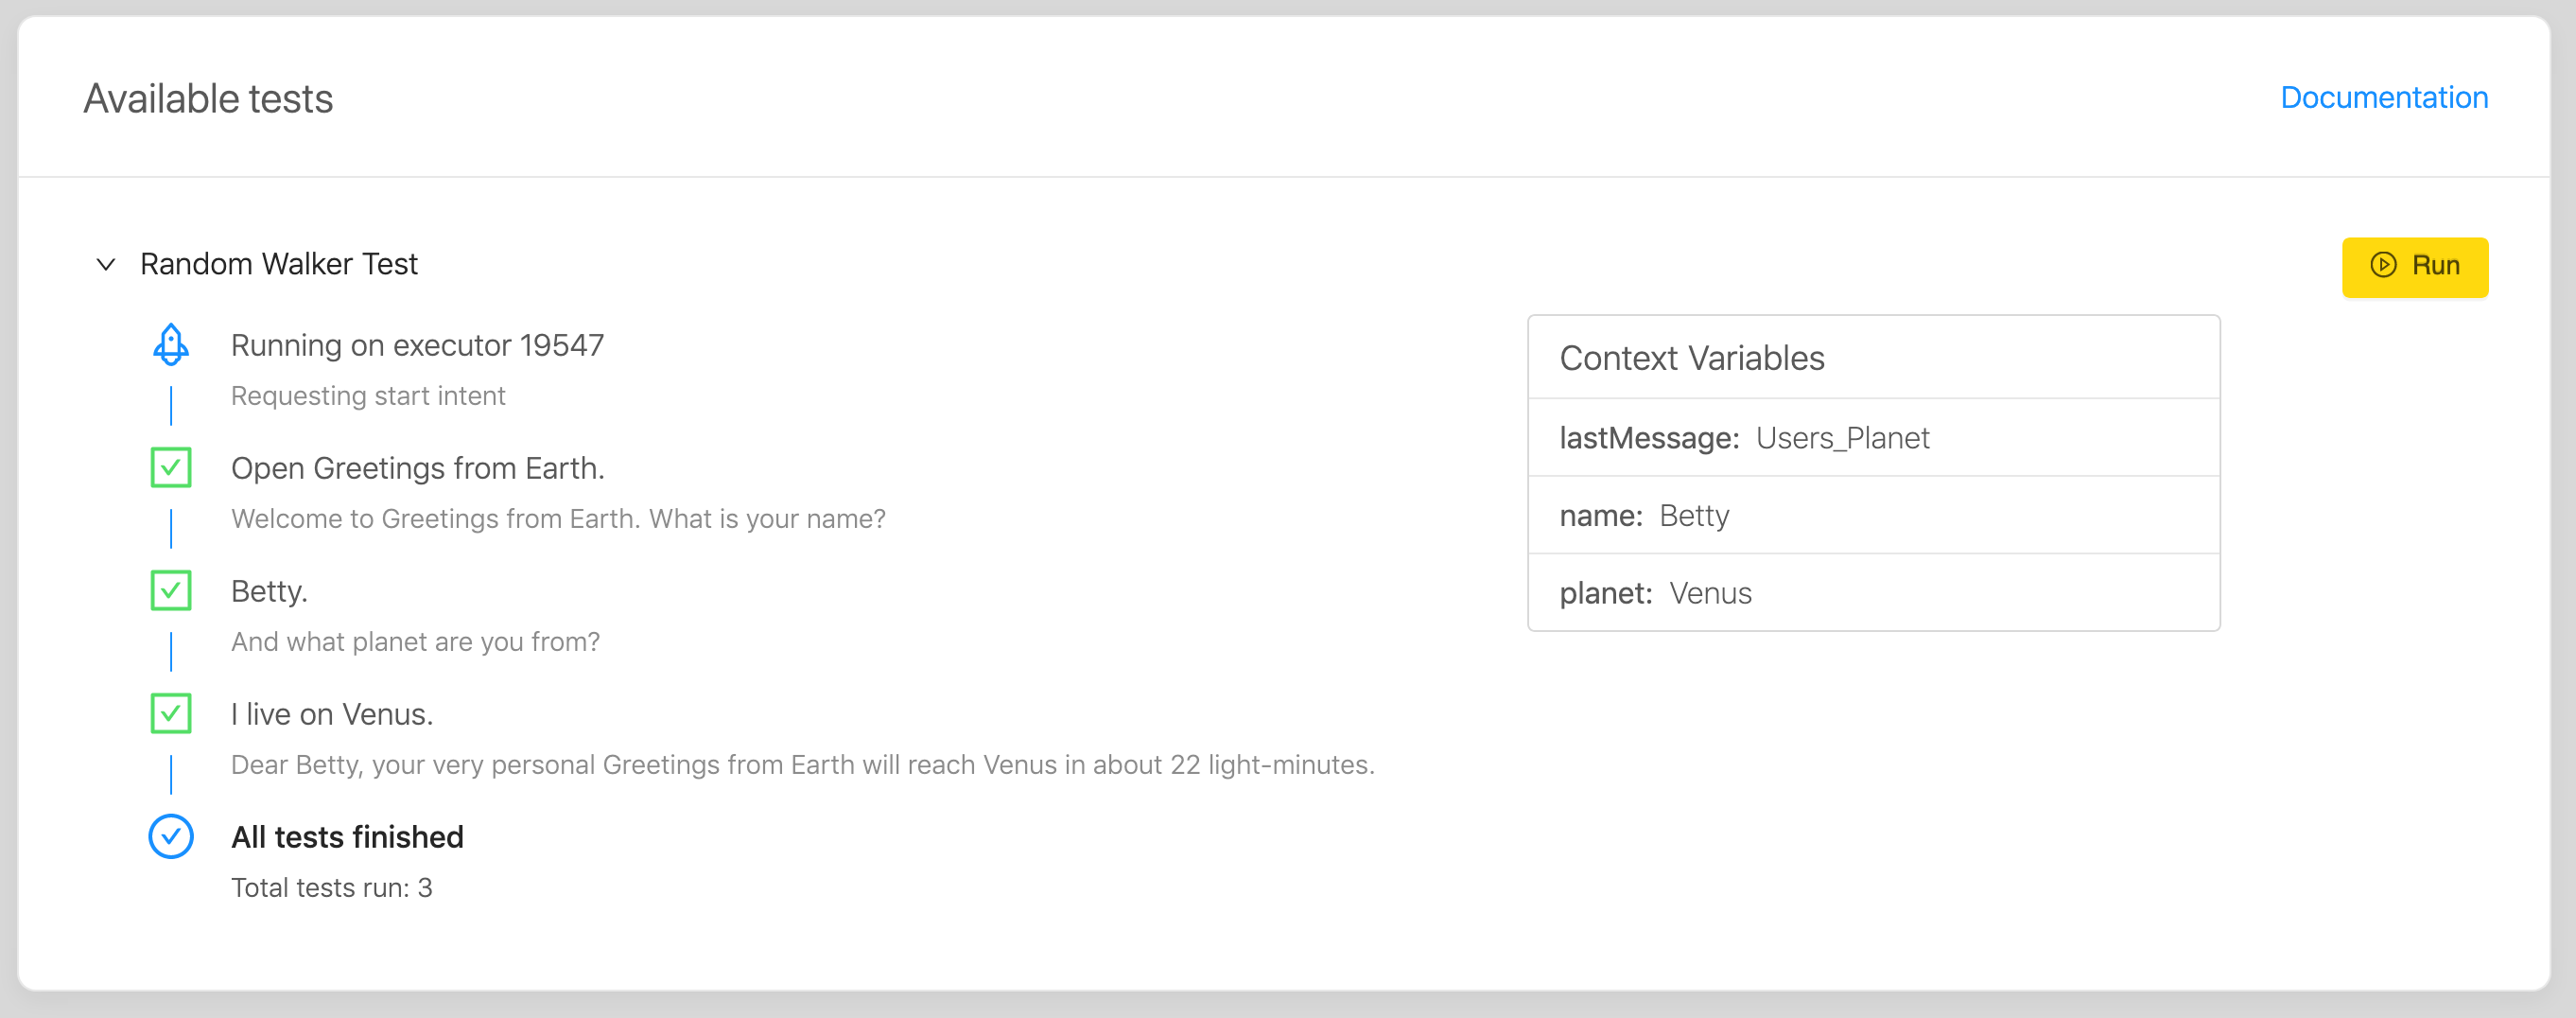
If you rerun the Random Walker Test, it chooses different values to fill in the name and planet variables. It is making the testing process even more exciting!
Next steps
Congratulations! You made a voice assistant speak, understand the user’s input and make decisions.
In the next chapters, we cover how to deploy your voice application as an Amazon Skill and Action on Google!