Use Alexa In-Skill Purchasing (ISP) with BotTalk
In-skill purchasing allows you to sell premium content directly from the Alexa Skills you created. Buying these digital products with voice is a seamless process to a user. A skill can suggest (upsell) a specific premium feature - and a user says something like “Yes, I want to buy product name”. Customers pay for products using the payment options associated with their Amazon account.
In this tutorial, you learn how to implement in-skill purchasing (ISP) in your Alexa Skills using online Skill building platform - BotTalk.
Table of Contents
What you’ll build
As always, it’s a great idea to draft a sample dialogue between a user and Alexa, before you start building the actual Skill.
That’s what our voice user experience is going to look (sound) like:
User: Hey Alexa, open Apple Game
Alexa: Welcome to Apple Game! The world’s largest virtual bio apple store! Here’s what we have today to offer: Apple Pie. Apple Basket. What would you like to buy?
User: I would like to buy an Apple Basket.
Alexa: Great apples in a large bio basket. Prime members save $0.19. Without Prime, your price is $0.99 plus tax. Would you like to buy it?
User: Sure.
Alexa: Great! You now have Apple Basket. Would you be interested in Apple Pie?
User: Yes.
Alexa: Apple Pie. Prime members save $0.19. Without Prime, your price is $0.99 plus tax. Would you like to buy it?
User: Yes.
Alexa: Great! You now have Apple Pie. Is there anything else I can help you with?
User: I would like a refund for an Apple Pie.
Alexa: For a refund, check out the link I sent to your Alexa app.
A lot is going on in this small dialogue. In the course of this tutorial, you learn about buying, upselling, refunding, and more.
So, let’s get started!
Create in-skill products
Before we start with coding, we need to create the product we want to sell in our skill.
Amazon ISP Documentation mentions three types of in-skill products that you can offer in your skill:
- One-time purchases: Entitlements that unlock access to features or content within a skill. One-time purchases do not expire.
- Consumables: Content or features that can be purchased, depleted, and purchased again. For example, hints for a game, in-game currency, or extra lives.
- Subscriptions: Offers access to premium content or features for some time. Users are charged regularly until they cancel their subscription.
To create your first product, you first need to create a skill.
To do that, go to BotTalk, login, and create a new scenario. You can go ahead and deploy your scenario to Amazon.
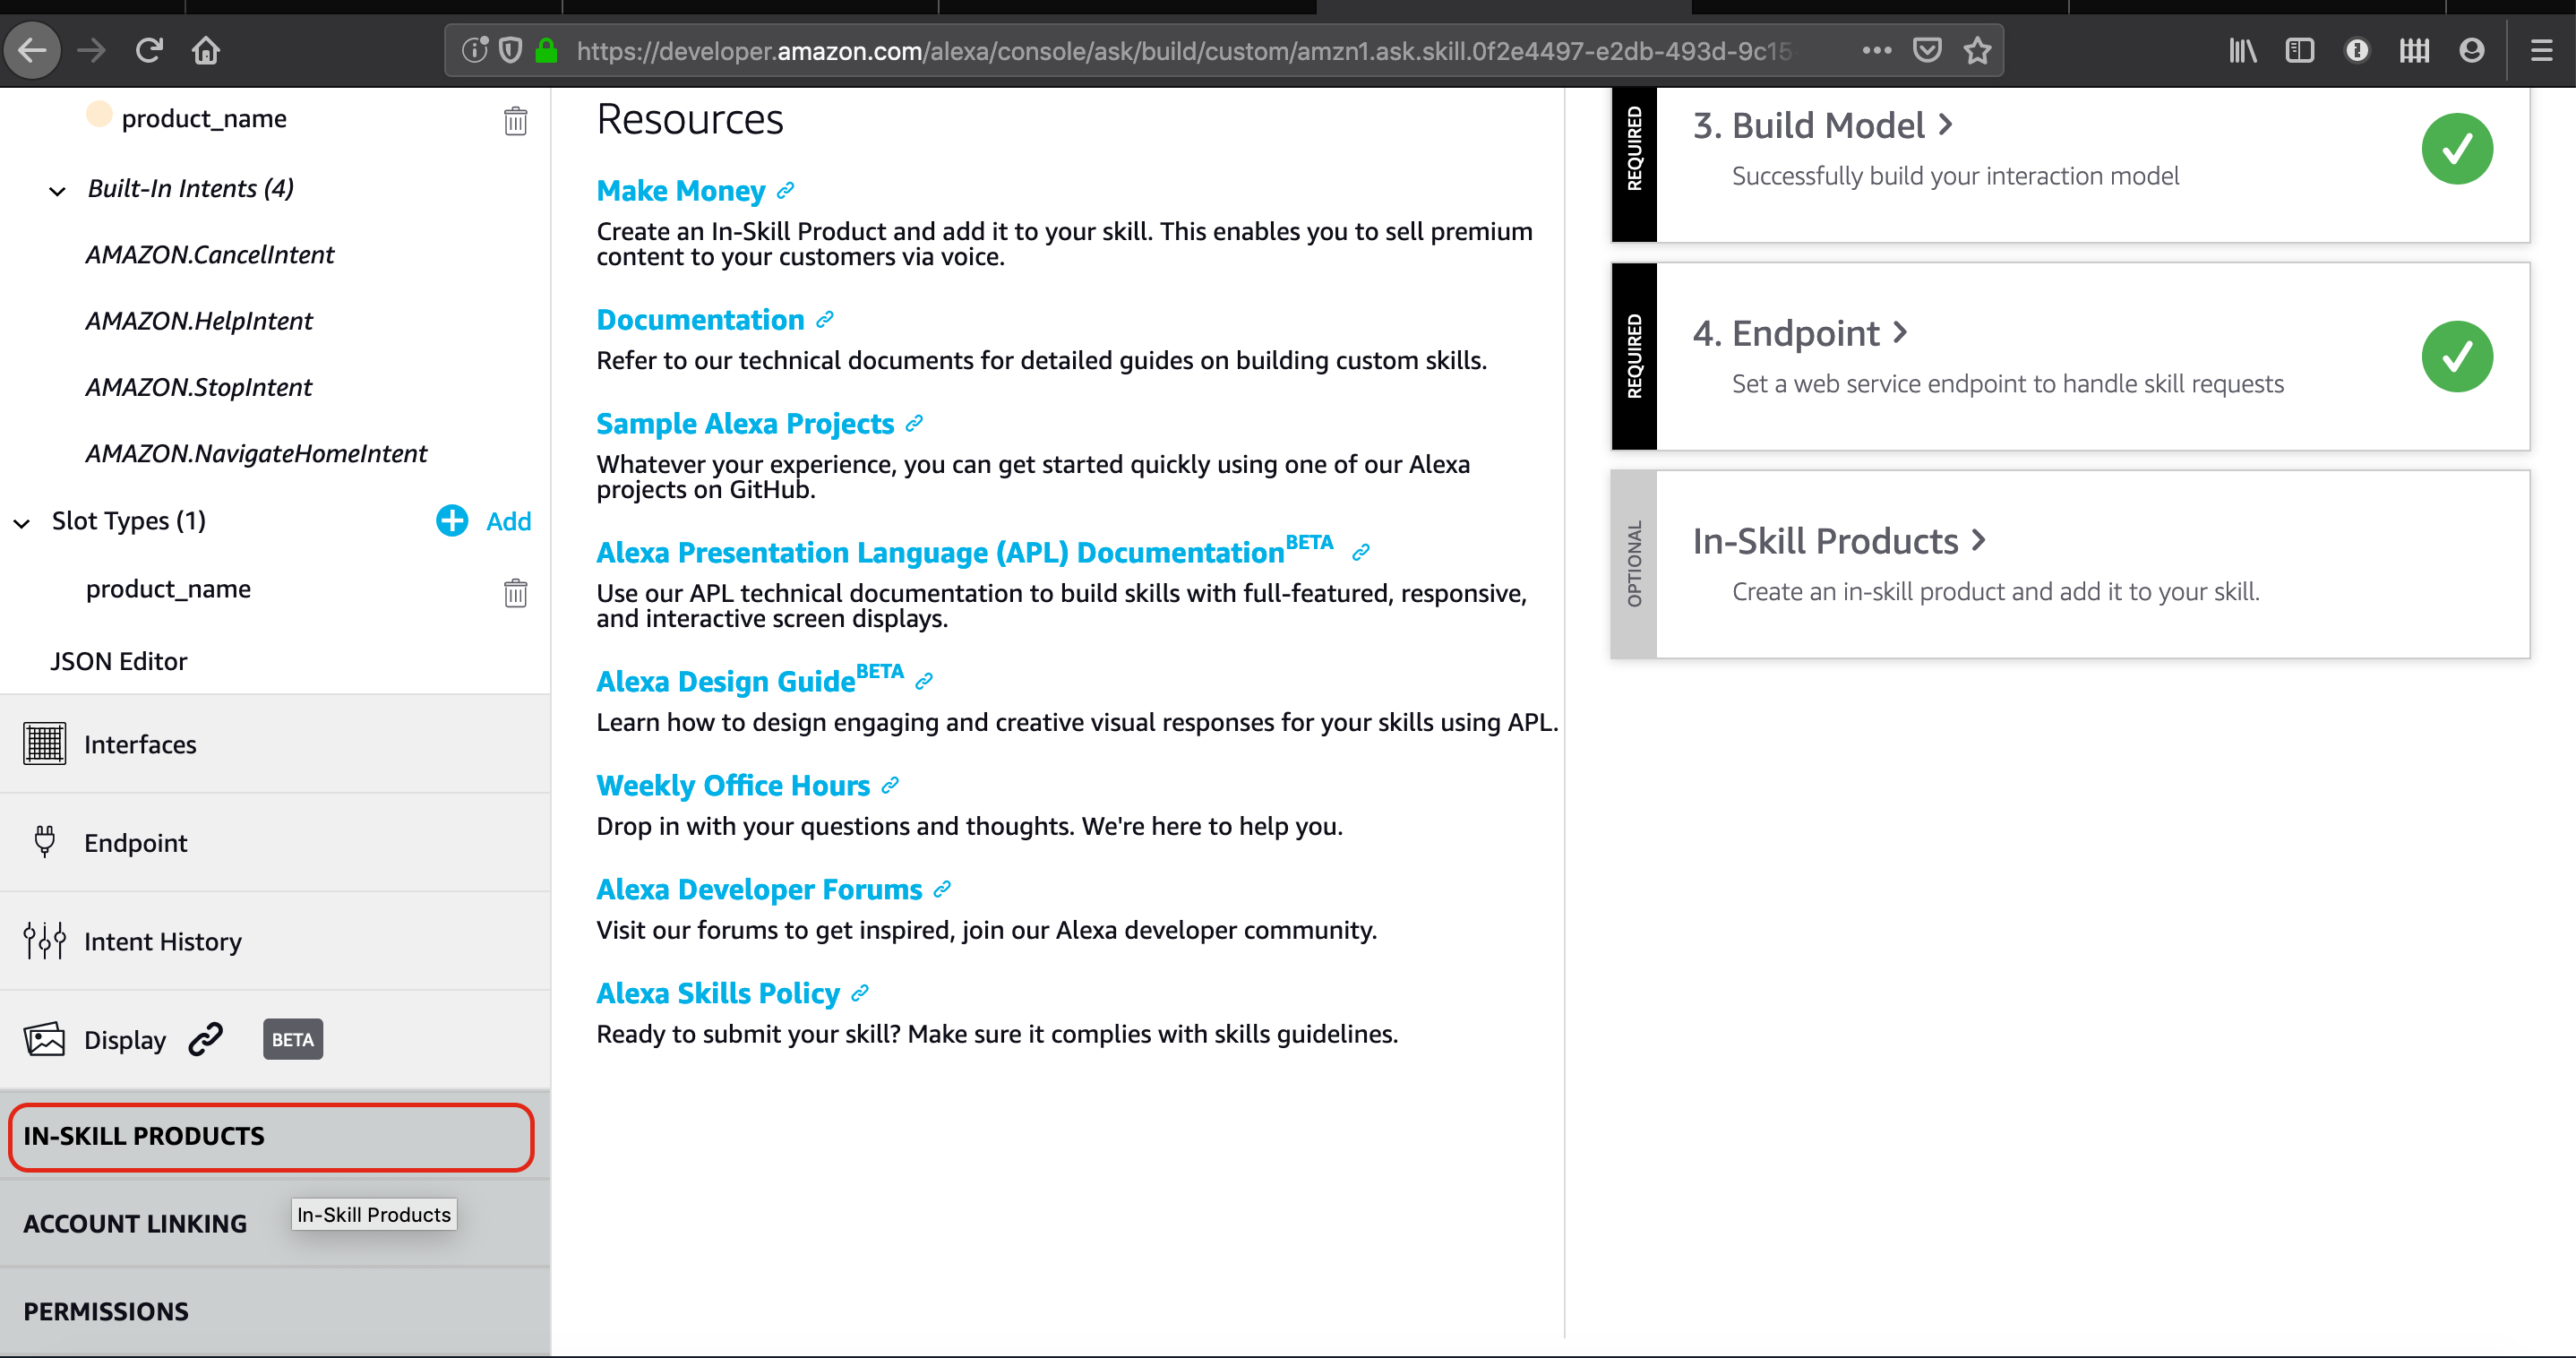
In the Amazon Developer Console, open the skill you’ve just deployed and from the left menu, choose the In-skill products item:
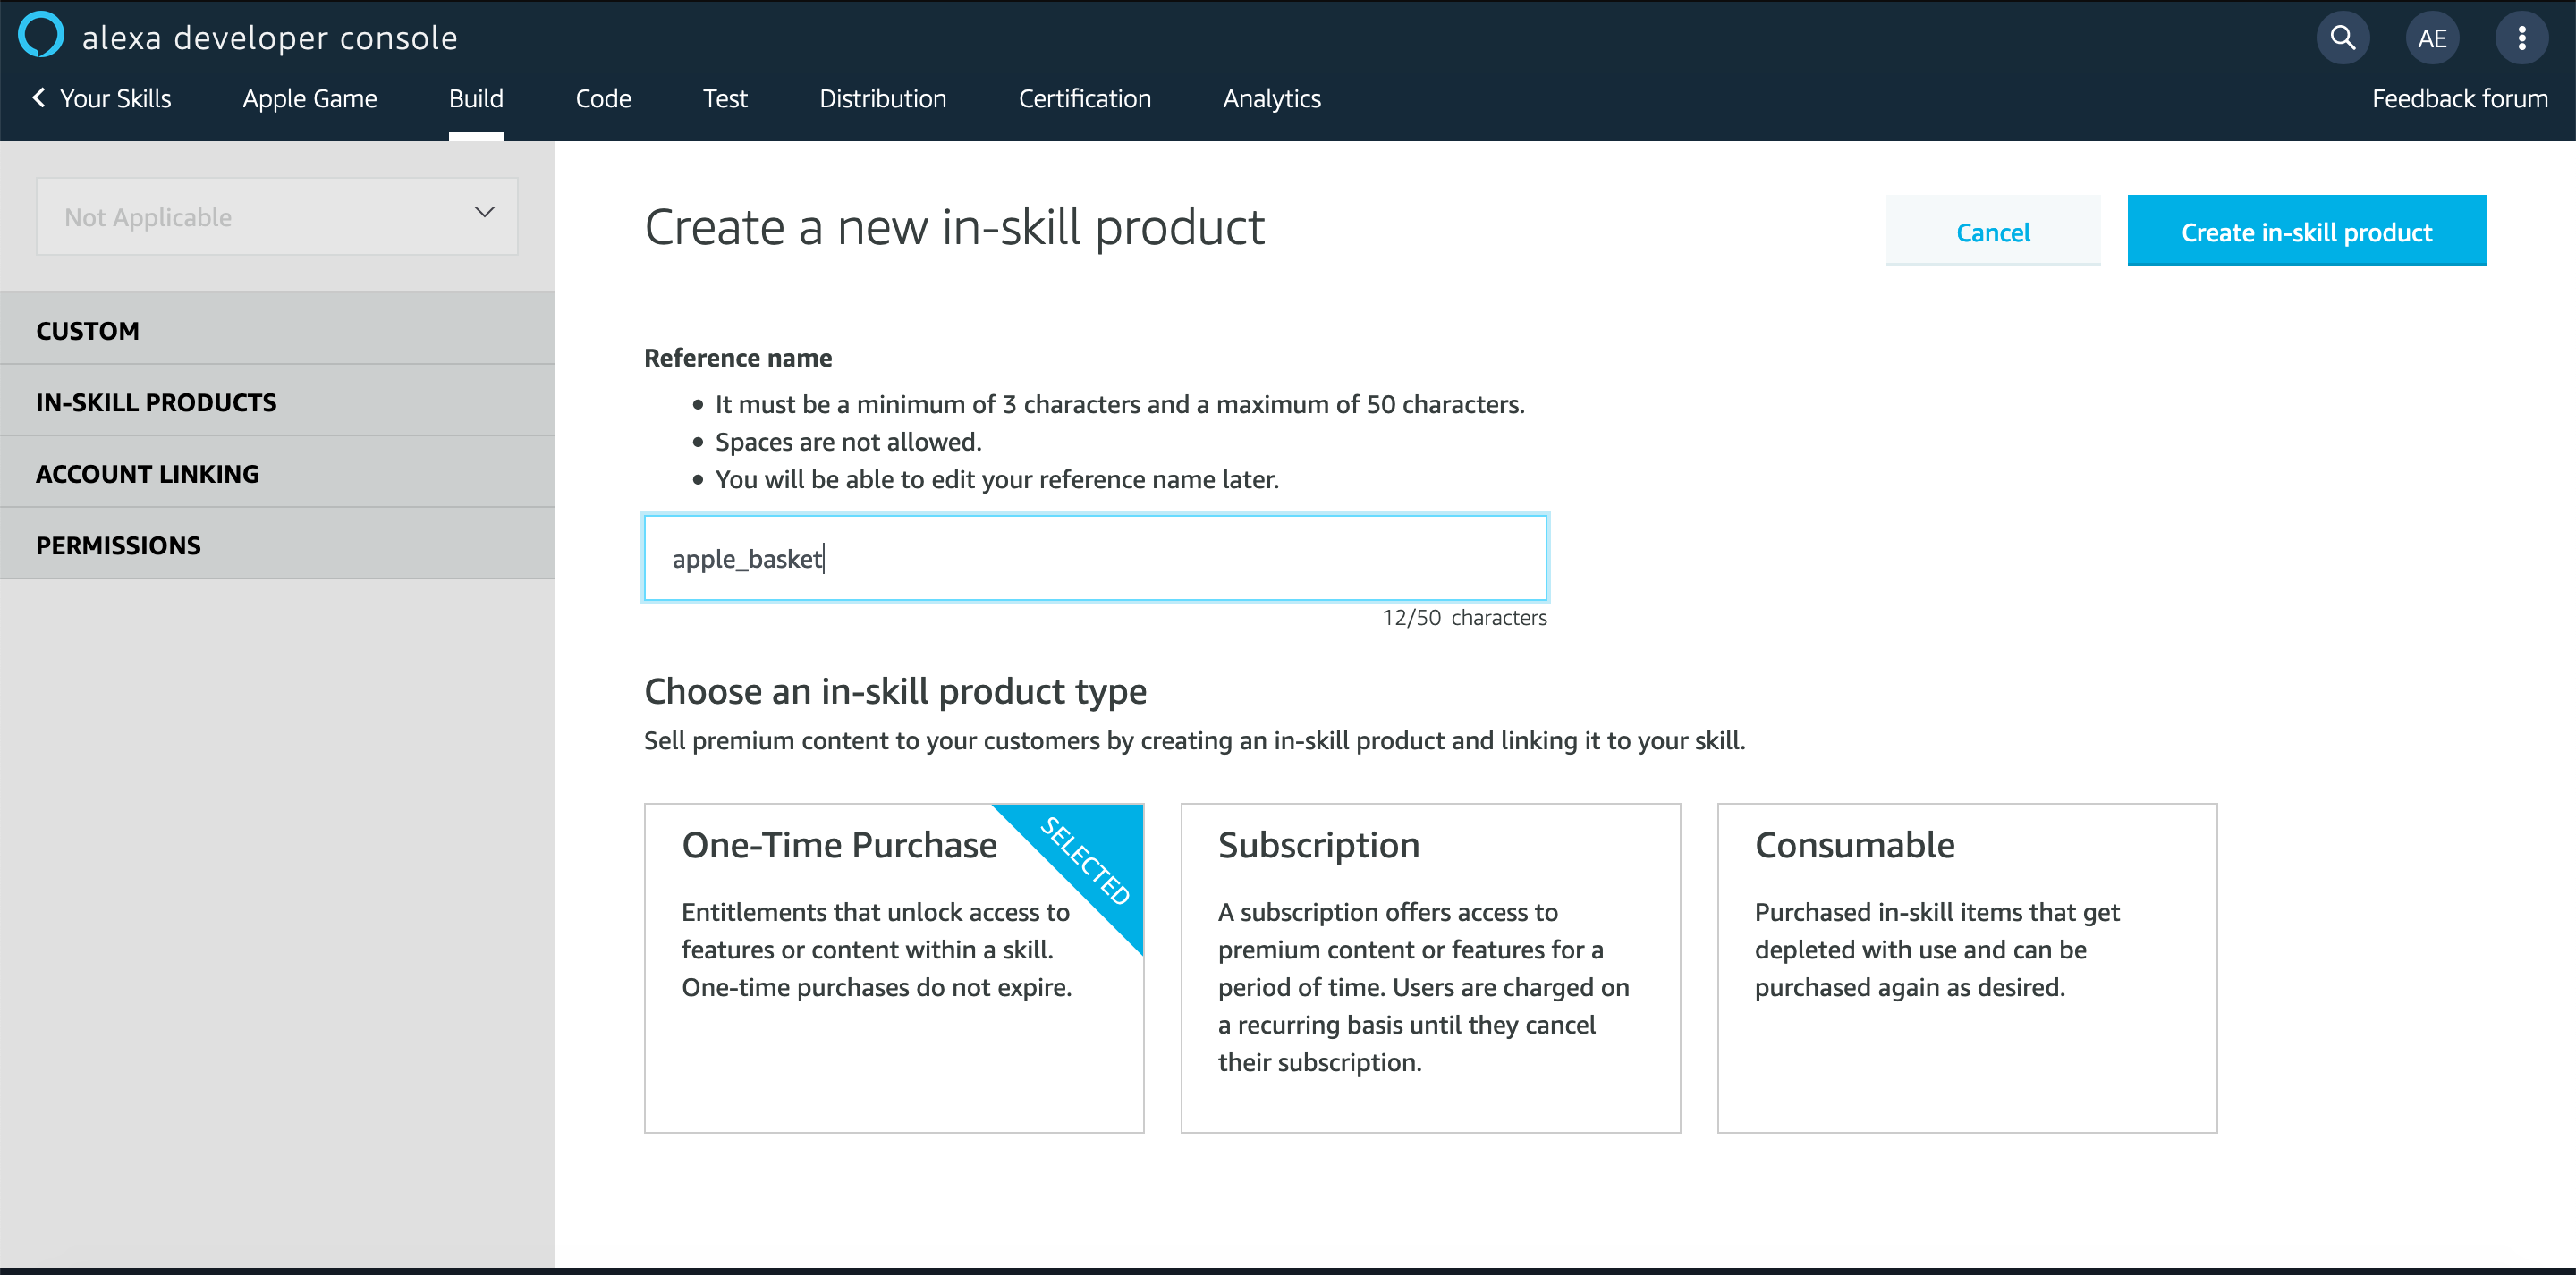
Click on the Create in-skill product button and fill in the form, by giving your product a name apple_basket and choosing the type of the product - One-time purchase:
The second screen of the wizard appears:
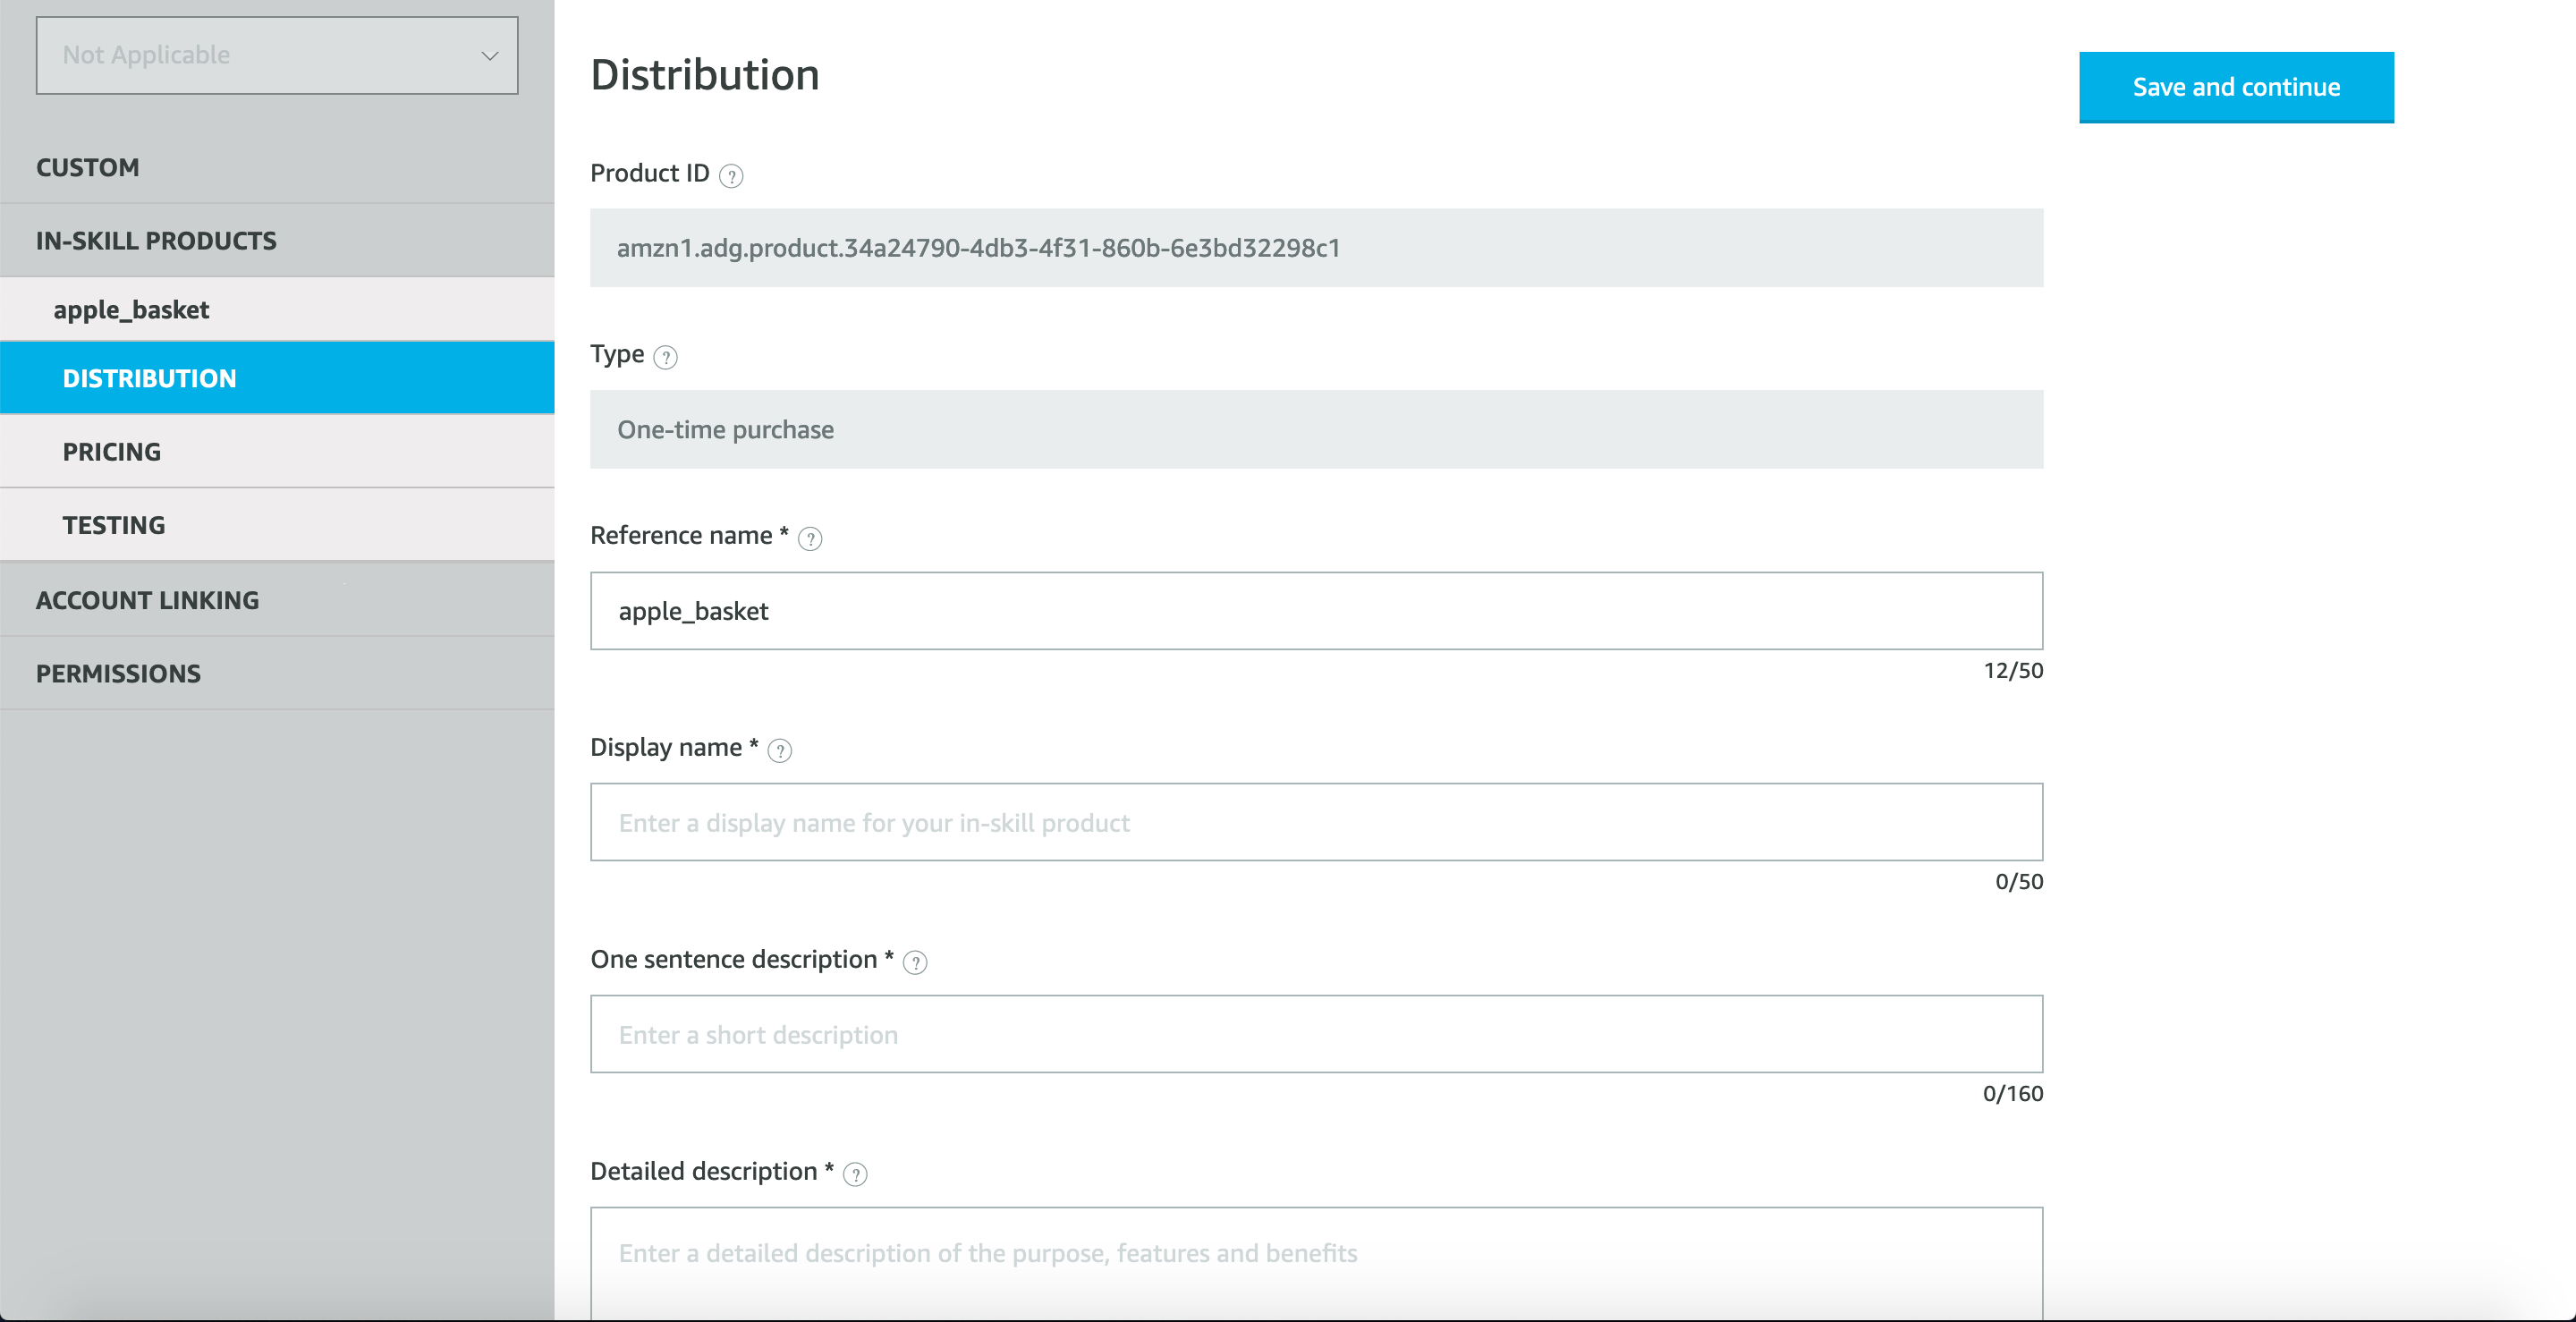
You must fill in the following form details:
- Reference name
- The canonical name of the in-skill product. This name is used when referring to the product in your code.
- Display name
- The name for the product for this locale. This name is included in purchase confirmation prompts, Alexa app purchasing cards, and email receipts.
- One sentence description
- A quick at-a-glance sentence that describes the product or what customers can do with it.
- Detailed description
- A full description explaining the product's functionality and any prerequisites to using it. This description is used in offer and purchase cards on screen devices.
- Example phrases
- List of example phrases that illustrate how users can ask for your in-skill product. These phrases must be supported in your voice model.
- Purchase confirmation description
- The description of the product a customer hears when making a purchase.
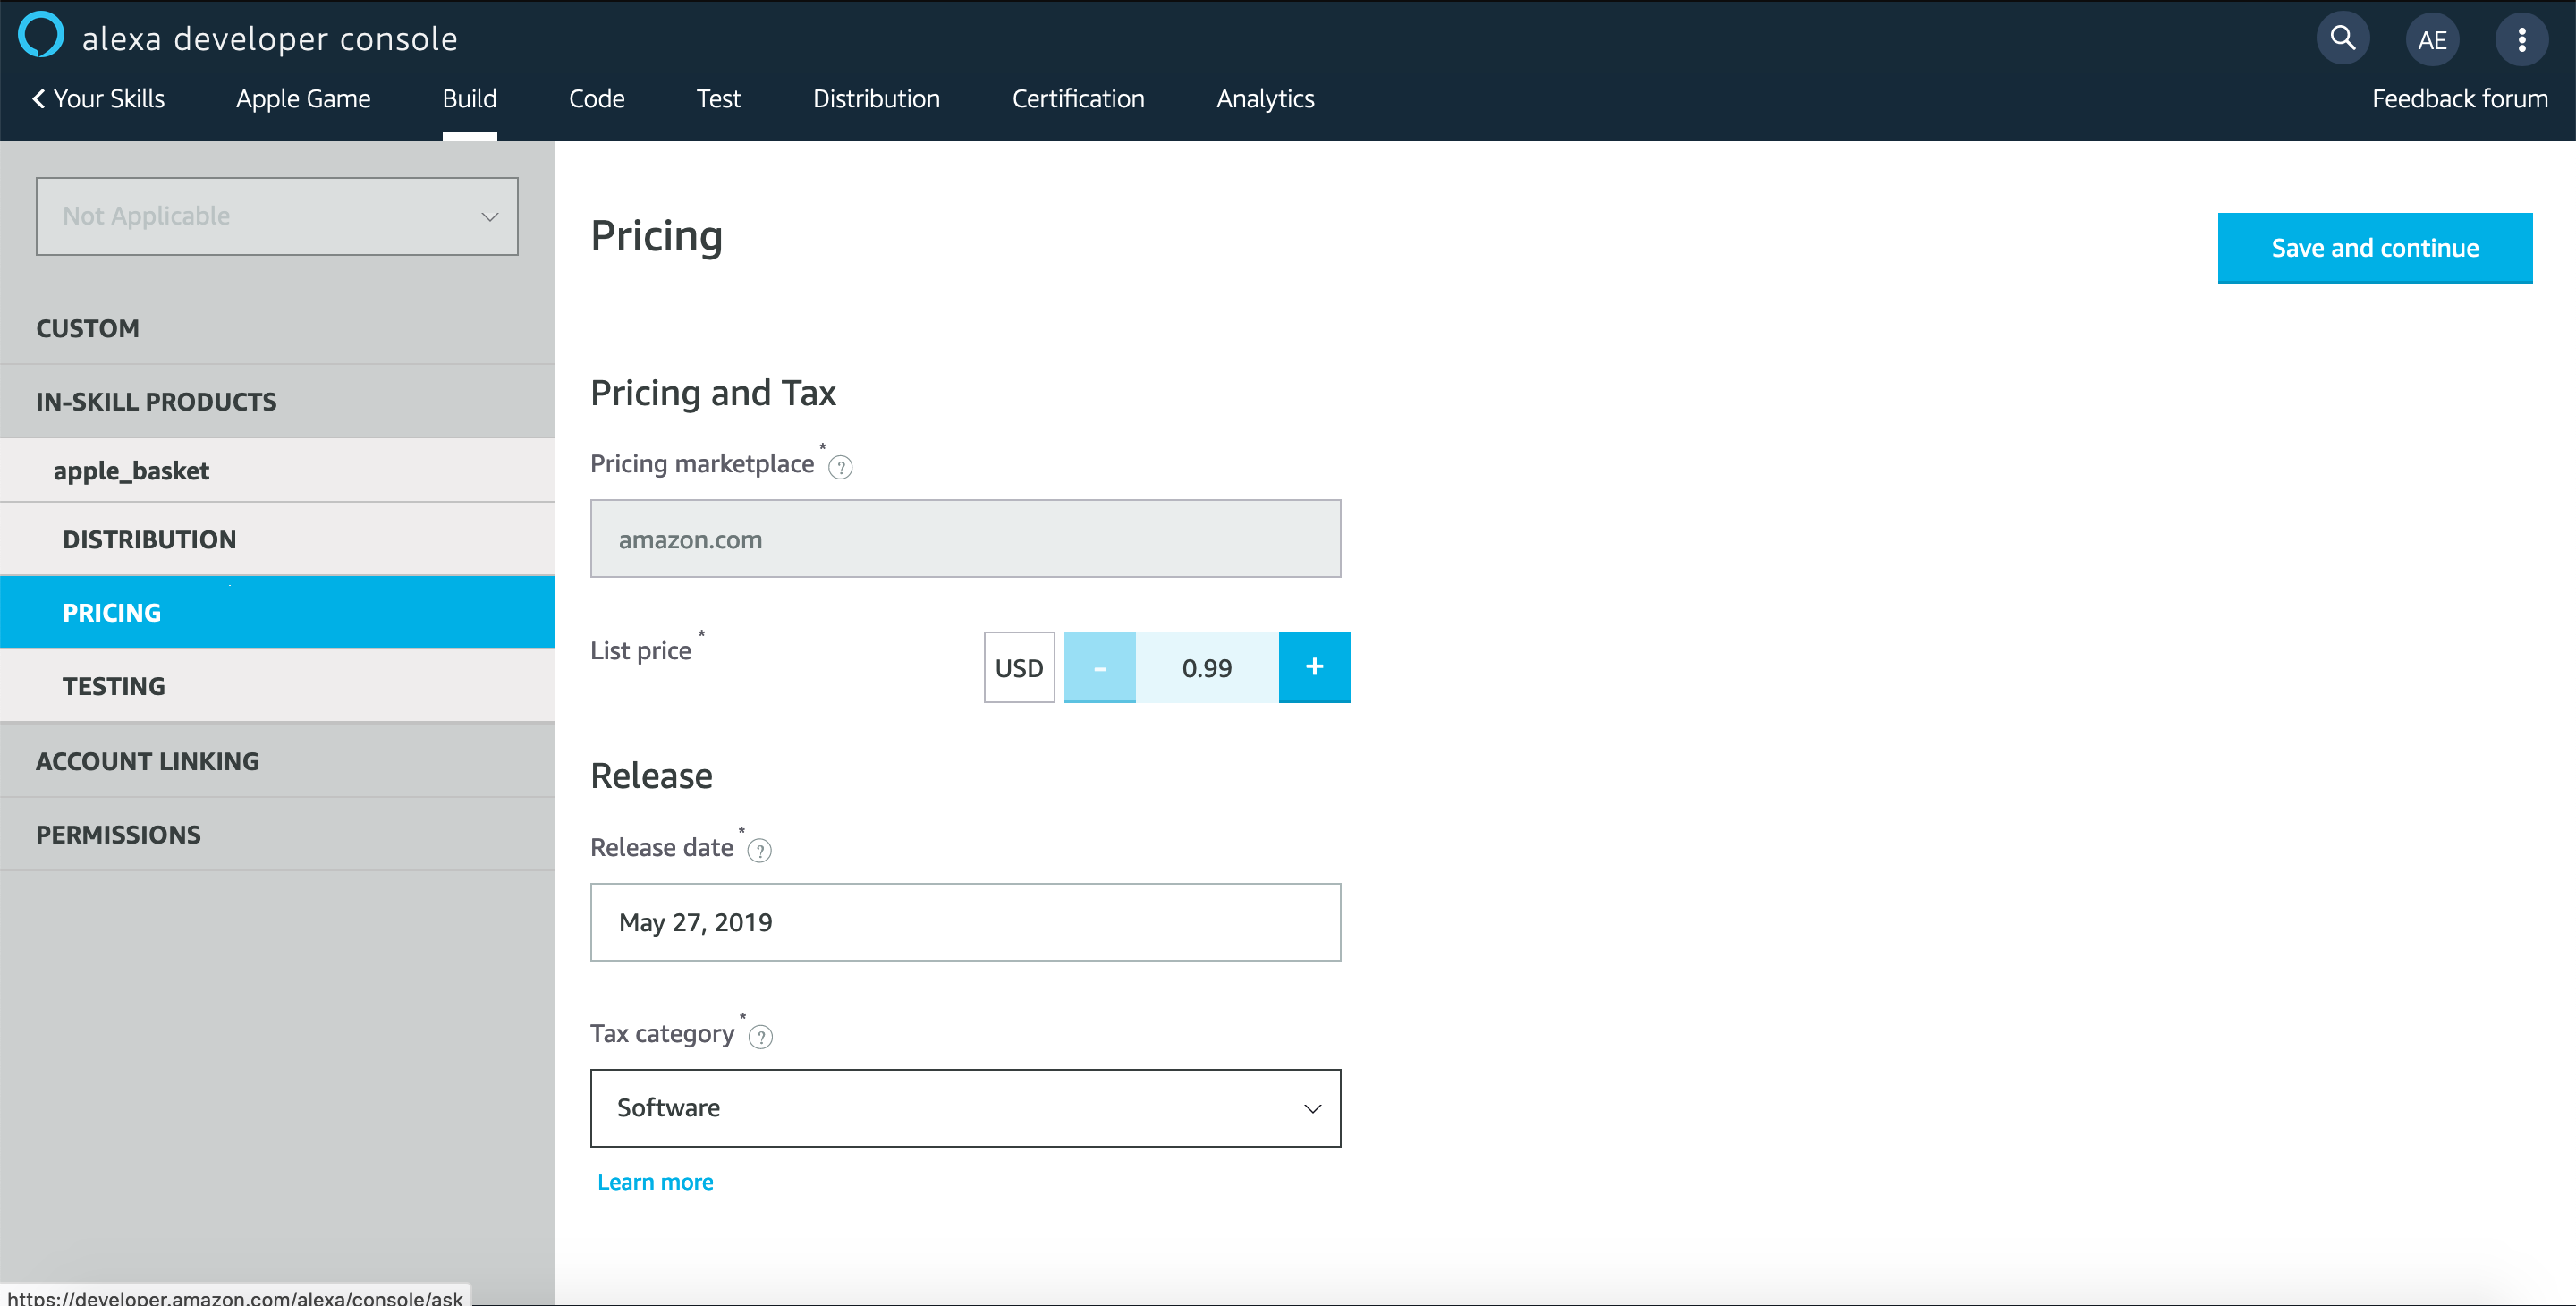
In the last step you need to provide the price and the tax category (software, periodicals, etc.) for your in-skill product:
When prompted, answer Link to the modal window asking you if you want to link this in-skill product to the selected skill.
After you’ve done creating apple_basket product, go ahead and repeat the steps above. But this time create a product apple_pie and choose the Consumable as the type of the product.
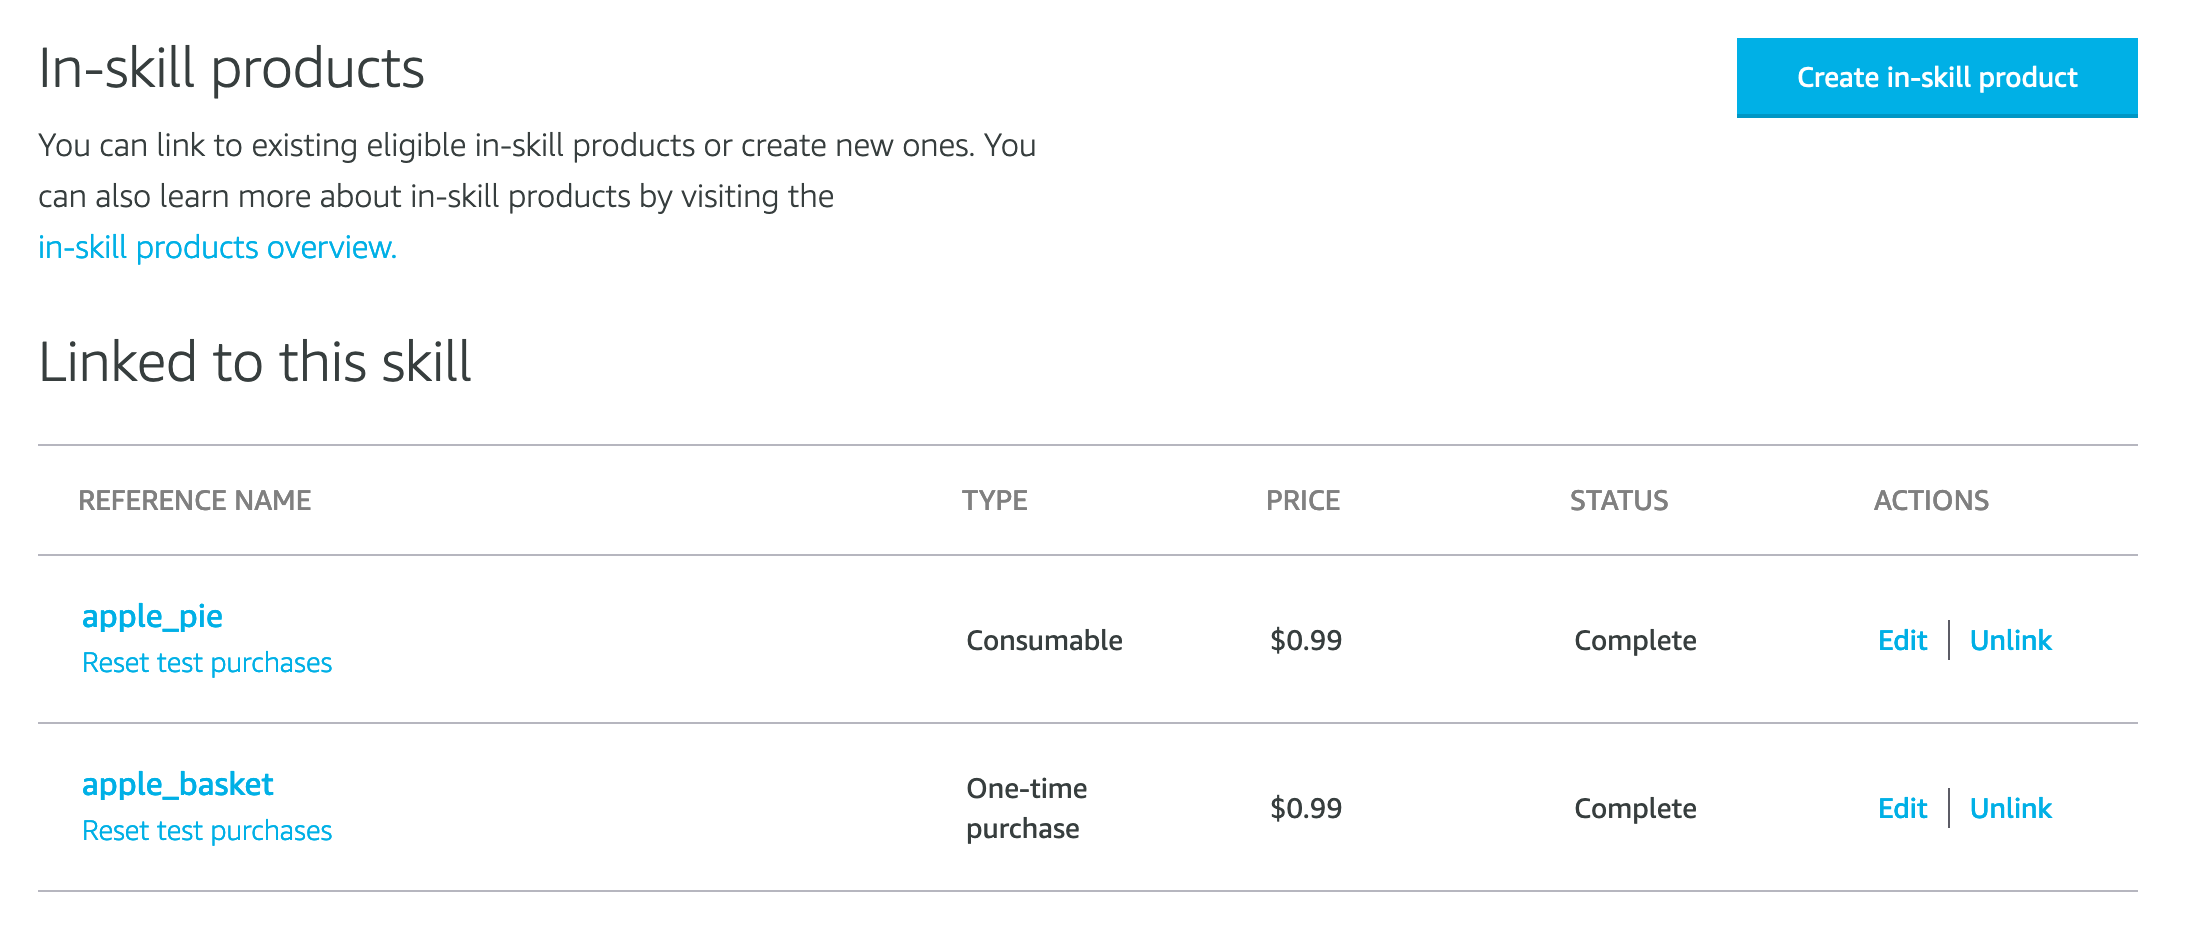
When you’re finished, your in-skill product list should look something like that:
Add ISP support to your BotTalk scenario
Now that you have your in-skill products set up, you need to do two things in BotTalk scenario:
- Add Intents and Slots that support buying and refunding products
- Add logic that makes
buy,upsellandcancelrequests to Amazon
Add Intents and Slots
You want your skill to support purchase requests from the user.
Every time the user says the following:
- I want to buy product name
- I want product name
- Alexa, ask skill invocation name to give me product name
your skill should understand that as purchase request intent and also be able to extact the product name as a slot.
Of course, you need to allow the users to ask for a refund, in case they didn’t like the product, or it was purchased by mistake.
In BotTalk editor, open the Intents section and add the following lines:
---
intents:
  buy_isp_intent:
    - 'give me {product_name}'
    - 'i want to buy {product_name}'
    - 'buy {product_name}'
    - 'i want {product_name}'
  cancel_isp_intent:
    - 'refund {product_name}'
    - 'I want a refund for {product_name}'
In the Slots section of the BotTalk editor add the following:
---
slots:

  product_name:
    - apple basket
    - apple pie
Now that you have added the required intents, you can go ahead and redeploy your scenario to Amazon to update the language model.
Add Logic
It’s time to get our hands dirty and write some logic that produces the dialogue described in the first section of this tutorial.
Open the Scenario tab of the BotTalk editor and let’s go through the logic step by step.
First of all, we need to send a welcome phrase to the user. We do that with the sendText action:
    - name: Initial step
      actions:
        - sendText: >
            Welcome to Apple Game!
            The world's largest virtual bio apple store!
            Here's what we have today to offer:
Then, we need to get the list of the products our skill supports. Usually, you would need to make an API request to Amazon, but BotTalk has a special ISP Plugin to make your life easier.
We can use the isp.getProducts action provided by this plugin to request all in-skill purchases:
    - name: Initial step
      actions:
        - sendText: >
            Welcome to Apple Game!
            The world's largest virtual bio apple store!
            Here's what we have today to offer:
        - isp.getProducts:
            input: true
The response to the isp.getProducts action is stored in the isp_response variable. The result is an array of objects, representing the in-skill products you’ve created in the previous steps. This is how the isp_response JSON object looks like:
{
   "inSkillProducts":[
      {
         "productId":"amzn1.adg.product.01321b13-7bcf-4e1b-81cb-31658fd009bb",
         "referenceName":"apple_pie",
         "type":"CONSUMABLE",
         "name":"Apple Pie",
         "summary":"Apple Pie",
         "entitled":"NOT_ENTITLED",
         "entitlementReason":"NOT_PURCHASED",
         "purchasable":"PURCHASABLE",
         "activeEntitlementCount":0,
         "purchaseMode":"TEST"
      },
      {
         "productId":"amzn1.adg.product.a4115c2d-7794-486d-9d03-61115575d1da",
         "referenceName":"apple_basket",
         "type":"ENTITLEMENT",
         "name":"Apple Basket",
         "summary":"Great apples in the basket",
         "entitled":"NOT_ENTITLED",
         "entitlementReason":"NOT_PURCHASED",
         "purchasable":"PURCHASABLE",
         "activeEntitlementCount":0,
         "purchaseMode":"TEST"
      }
   ],
   "nextToken":null,
   "truncated":false
}
Note: For debugging purposes, you can get any JSON representation of the object stored in any variable by using the json_encode TWIG filter. For example, to get the JSON in the listing above, we used the following command:
  - isp.getProducts:
      input: true
  - sendText: '{{ isp_response | json_encode }}'
Now we can use TWIG for tag to iterate over the list of the products.
The complete Initial step looks like that:
    - name: Initial step
      actions:
        - sendText: >
            Welcome to Apple Game!
            The world's largest virtual bio apple store!
            Here's what we have today to offer:
        - isp.getProducts:
            input: true
        - sendText: >
            {% for product in isp_response.inSkillProducts %}
                {{ product.name }}.
            {% endfor %}
        - sendText: 'What would you like to buy?'
        - getInput:
      next:
        buy_isp_intent: Buy Product Step
        cancel_isp_intent: Cancel Product Step
        AMAZON.CancelIntent: Exit
        AMAZON.StopIntent: Exit
        AMAZON.HelpIntent: Help
Great! Now that we have all the products, the user can choose one. So when the user says something like:
User: I would like to buy an Apple Basket.
buy_isp_intent is called, and Buy Product Step will be executed:
        - name: Buy Product Step
          entrypoint: true
          actions:
            - isp.getProduct:
                input: true
                reference: "{{ product_name | replace({' ': '_'}) | lower }}"
            - isp.buy:
                output: true
                productId: '{{ isp_response.productId }}'
                productToken: '{{ product_name }}'
In order to execute an isp.buy action, we need a productId. But the user only says the name of the product.
So we use another ISP Plugin action called isp.getProduct to get the JSON object representing our products.
This action that takes reference as a parameter.
Remember, in the Create in-skill products section, you’ve created a couple of products. They all had the same schema, called reference name:
Since our slots (apple pie and apple basket) don’t have the underscore in them, we use TWIG replace filter to add one.
Before we can test in the Amazon Developer Console, there is one more thing we need to add to our logic.
Every time a buy, upsell or cancel action is performed, Alexa sends a special EVENT.
You can react to these special events, by putting them into the next section and connecting to the corresponding steps:
        - name: Initial step
          actions:
            - sendText: >
                Welcome to Apple Game!
                The world's largest virtual bio apple store!
                Here's what we have today to offer:
            - isp.getProducts:
                input: true
            - sendText: >
                {% for product in isp_response.inSkillProducts %}
                    {{ product.name }}.
                {% endfor %}
            - sendText: 'What would you like to buy?'
            - getInput:
          next:
            buy_isp_intent: Buy Product Step
            cancel_isp_intent: Cancel Product Step
            ISP.OnUpsell: Upsell Success Check
            ISP.OnBuy: Buy Success Check
            ISP.OnCancel: Cancel Success Check
            AMAZON.CancelIntent: Exit
            AMAZON.StopIntent: Exit
            AMAZON.HelpIntent: Help
In our case, right after the Buy Product Step is executed, Alexa would send the ISP.OnBuy event and you can answer to that event in the Buy Success Check.
In this step, we can check, if the transaction went the way we planned, by accessing the variable purchaseResult.
This variable indicates the result of the purchase transaction and can have one of these values:
ACCEPTEDDECLINEDALREADY_PURCHASEDERROR
        - name: Buy Success Check
          when: 'purchaseResult != "ACCEPTED"'
          entrypoint: true
          actions:
            - sendText: >
                {% if purchaseResult == 'ACCEPTED' %}
                  The transaction was accepted.
                {% elseif purchaseResult == 'DECLINED' %}
                  The transaction was declined.
                {% elseif purchaseResult == 'ALREADY_PURCHASED' %}
                  You already purchased {{ product_name }}.
                {% elseif purchaseResult == 'ERROR' %}
                  There was an error.
                {% else %}
                  This should never happen actually.
                {% endif %}
          next:
            else: Upsell Apple Pie
We use when - a logical condition in this step, to only execute the actions inside of this step when the purchase result failed.
If the purchaseResult was ACCEPTED, then we jump on to the next step Upsell Apple Pie
If you remember our little happy path dialogue from the first section of this tutorial, just after selling a user an Apple Basket we’d like to upsell an Apple Pie as well:
Alexa: Great! You now have Apple Basket. Would you be interested in Apple Pie?
User: Yes.
That’s how we implement it in BotTalk scenario:
        - name: Upsell Apple Pie
          actions:
            - isp.getProduct:
                input: true
                reference: "apple_pie"
            - isp.upsell:
                input: true
                output: true
                message: 'Would you be interesed in Apple Pie?'
                productId: '{{ isp_response.productId }}'
                productToken: 'Apple Pie'
In comparison to isp.buy the isp.upsell action has one additional parameter - it’s the message that would be read to the user before he agrees to buy a product.
As with the buy directive, BotTalk needs to react to the ISP.OnUpsell event that is coming just after the isp.upsell is executed.
That’s what we do in the Upsell Success Check step:
        - name: Upsell Success Check
          entrypoint: true
          actions:
            - sendText: >
                Is there anything else I can help you with?
            - getInput:
          next:
            buy_isp_intent: Buy Product Step
            cancel_isp_intent: Cancel Product Step
Ok, the buying and upselling is done!
The very last step is to handle the refund intent of the user - cancel_isp_intent
We do that in the Cancel Product Step:
        - name: Cancel Product Step
          entrypoint: true
          actions:
            - isp.getProduct:
                input: true
                reference: "{{ product_name | replace({' ': '_'}) | lower }}"
            - isp.cancel:
                output: true
                productId: '{{ isp_response.productId }}'
                productToken: '{{ product_name }}'
Test your skill
Head over to the Alexa Developer Console, open the Alexa Simulator and go through the happy path we defined in the first step of this tutorial.
Alternatively, which is arguably more fun, open your Alexa device and do the testing there:
Source Code
You can find the complete source code for this tutorial in our GitHub Repository.
Final Words
Did you like this tutorial? Please spread the world and share it on Facebook, Twitter, Reddit - whatever.
Thank you so much!
🤖